In this tutorial we will see how to deploy a FastAPI app on GCP App Engine. The tutorial will give a detailed walk through on how to create an app on Google Cloud Platform and deploy a FastAPI application implemented in python. By the end of tutorial you will learn how to deploy FastAPI app on Google Cloud Platform.
Table of Contents
- Prerequisites
- YAML Configuration to deploy FastAPI on Google App Engine
- Project Setup
- Preview FastAPI app on GCP App Engine
- Deploying FastAPI application on App Engine
- Delete the Project
- Video Tutorial
Prerequisites
- Internet
- Google Cloud Platform account with Activated Billing account.
YAML Configuration to deploy FastAPI on Google App Engine
Google Cloud Platform allows App Engine to perform deployment based on a configuration defined in a yaml file. For us to host the FastAPI on Google App Engine, the yaml configuration needs to have the following configuration.
runtime: python37
entrypoint: gunicorn -w 4 -k uvicorn.workers.UvicornWorker main:app
Our repository has a file app.yaml at the root of the FastAPI project, that has the above specified yaml configuration to help deploy FastAPI to App Engine.
Project Setup
Login to Google Cloud Platform with the activated billing account.
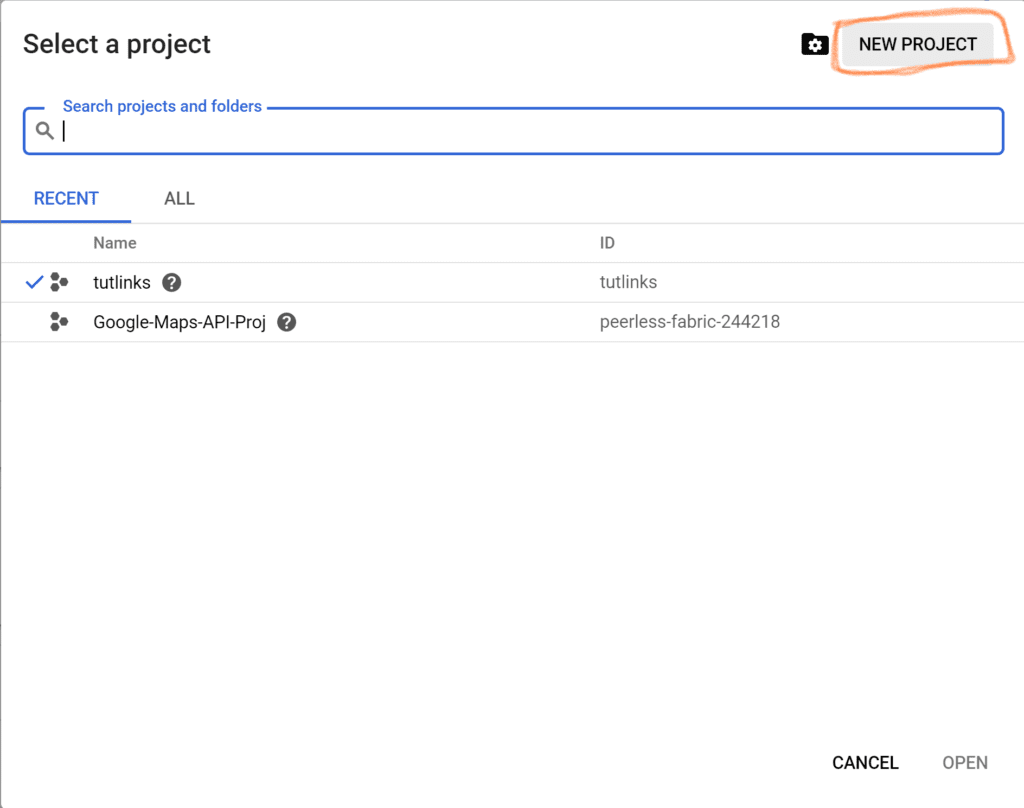
Create a New Project on Google Cloud Platform
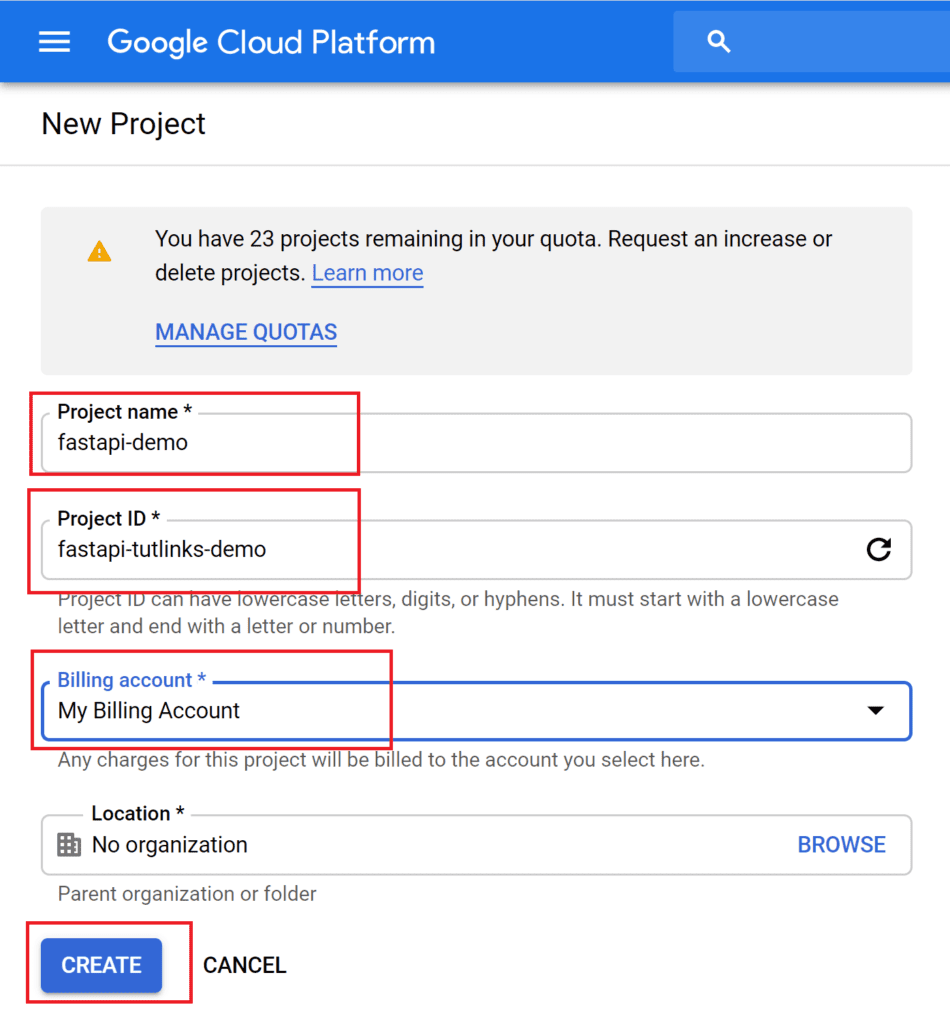
Ensure to create a new project in GCP. For the new project being created, give Project name, Project ID, Billing account and click Create.
Activate Cloud Shell

Locate and click on the Activate Cloud Shell icon (having text >_) that is available in the top right of the logged in Google Cloud Platform home page.
Clone Hello World FastAPI Repository from GitHub
The sample python based hello world FastAPI app is hosted on github repository. Type the following command in the Cloud Shell to clone the FastAPI repository on to GCP.
git clone -b fastapi-deploy-google-cloud-platform https://github.com/windson/fastapi.git
To learn more about the hello world app implemented using FastAPI, you can go through the detailed tutorial here.
Set the current working directory to fastapi by typing the following command.
cd fastapi
Create the virtual environment
Create the virtual environment named env by typing the following command in cloud shell.
virtualenv env
Activate the virtual environment
Activate the virtual environment by typing the following command in cloud shell.
source env/bin/activate
Install Requirements for FastAPI
The project related libraries are located in requirements.txt. To install all the modules in one go, run the following command.
pip install -r requirements.txt
Preview FastAPI app on GCP App Engine
We will first do sanity and check if any issues we have running the app on Google App Engine. For that we will perform preview mode deployment of FastAPI. The preview deployment mode is not the standard and is just to double check and troubleshoot application deployment.
Run the FastAPI app via Google Cloud Shell
In the Google Cloud Shell, execute the following command to run the hello world Flask app
gunicorn -w 4 -k uvicorn.workers.UvicornWorker main:app
gunicornis the WSGI server to which we are configuring our application to run on, with the following configuration.-w 4indicates that we need our application to run on gunicorn with four worker processes.-k uvicorn.workers.UvicornWorkertells the gunicorn to run the application using uvicorn.workers.UvicornWorker worker class.main:appis our module main where our FastAPI() app is initialized.
You can also specify the host and port. But GCP will automatically figure them out and no extra configuration is needed for this demo.
Understanding the output emitted by gunicorn command execution
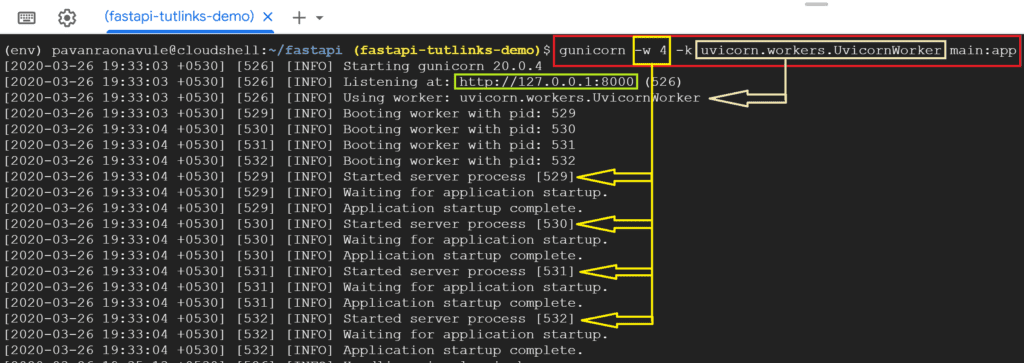
We will understand output emitted by the execution of the aforementioned Gunicorn command.
Notice that the Gunicorn version 20.0.4 server is started as a first step of execution. This version of Gunicorn is same as the available version mentioned in requirements.txt of our repository.
In the second line that says Listening at: http://127.0.0.1:8000 indicates that our FastAPI app is running on localhost on port 8000 of the app engine.
Also we can notice that our FastAPI app has been spun up on the four worker processes having PIDs 529, 530, 531, 532. You may notice different PIDs based on the availability.
Preview the running app in GCP
To see everything works fine, lets preview our hello world FastAPI app and see if it is running properly.

For preview, click on Preview button at the top right of the cloud shell as shown. Select change port and choose 8000 as our port on which our app can be previewed. We are choosing 8000 because our app is listening at http://127.0.0.1:8000/.
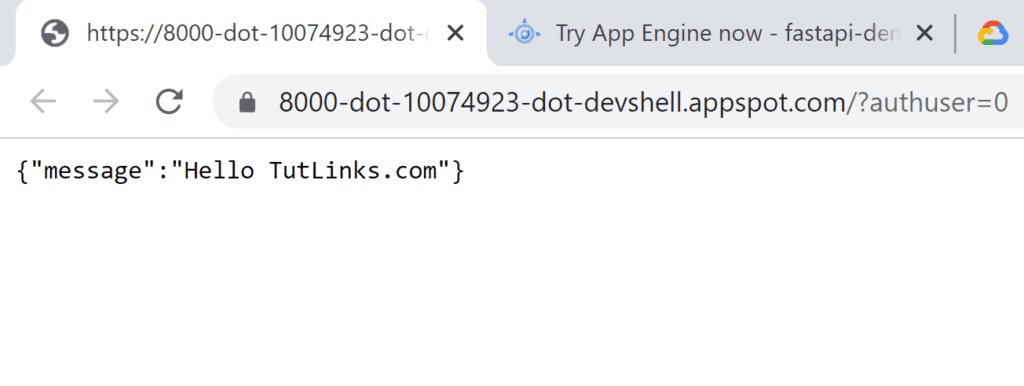
Now you will be taken to a new window where the page shows {“message”:”Hello TutLinks.com”}
Deploying FastAPI application on App Engine
To deploy the FastAPI app on App Engine and access it via a custom domain or default your-proj-id.appspot.com, we need to create gcloud app and deploy our app.
Create App on GCP
In the cloud shell, type the following command to create the app.
gcloud app create
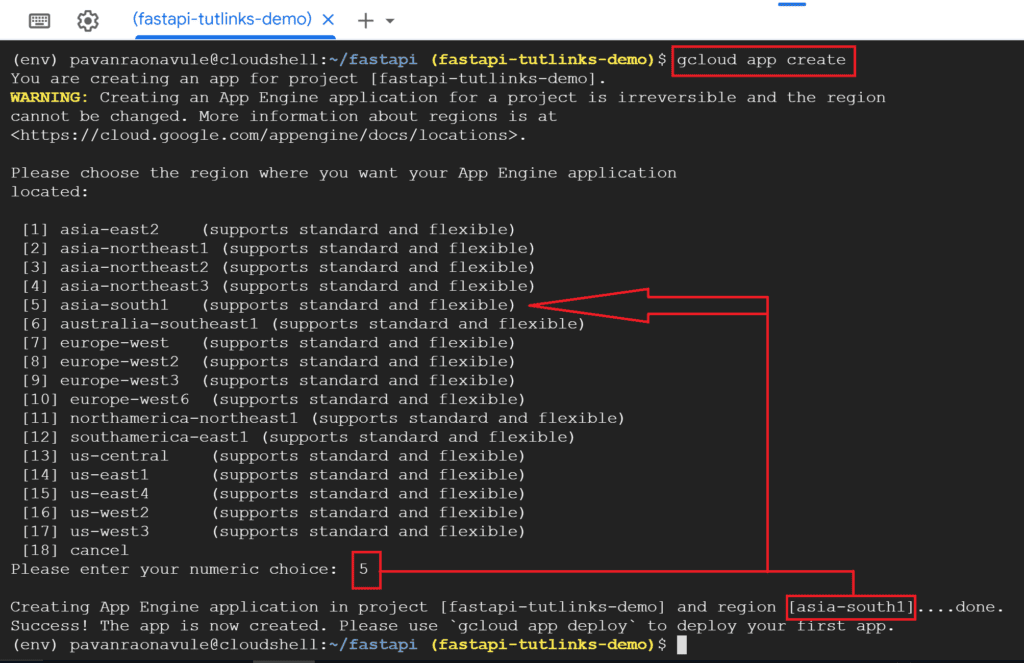
You will be prompted to select the region. It is always a best practice to choose the region nearest to the geographical location where the consumers access this application. Doing so is expected increase the response times from our application.
Deploy FastAPI app on GCP App Engine
GCP App Engine requires all the deployment configuration to be defined in a yaml file. Our repository has already has a yaml file named app.yaml that has the deployment configuration defined. Run the following command in Google Cloud Shell to deploy the FastAPI app to Google App Engine.
gcloud app deploy app.yaml
You will be prompted to continue. Press Y and hit enter to proceed with the deployment.
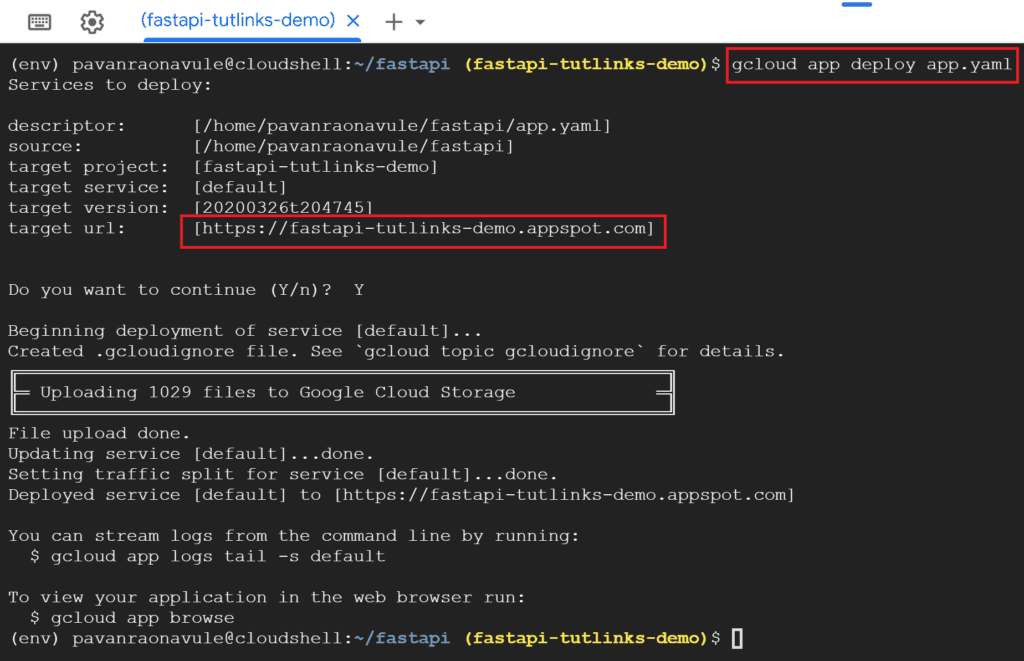
Optionally you can also explicitly mention the project argument to the deployment command to be sure to mention the project where the app needs to be deployed using the following command.
gcloud app deploy app.yaml --project fastapi-tutlinks-demo
You must replace the fastapi-tutlinks-demo with the respective project id of the project you are working with in the above command.
Browse the FastAPI deployed on GCP App Engine
Generally your app is deployed on the url that has the following format. your-project-id.appspot.com. In case you are not sure what the project id is, then type the following command to view your application in the web browser.
gcloud app browse
For testing we will send a request to the default endpoint via postman.
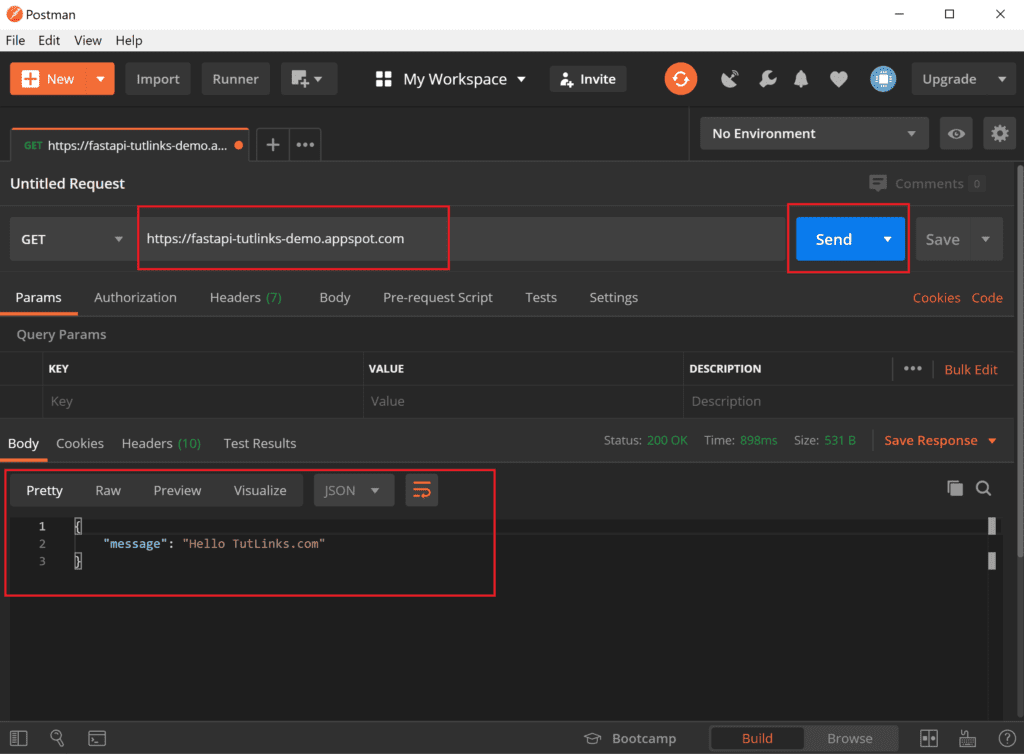
Access Logs to troubleshoot
You can see what is happening like errors or info messages if at all being logged by our application running on the Google App Engine. To do that you can stream logs from the cloud shell command line by running the following command.
gcloud app logs tail -s default
Delete the Project
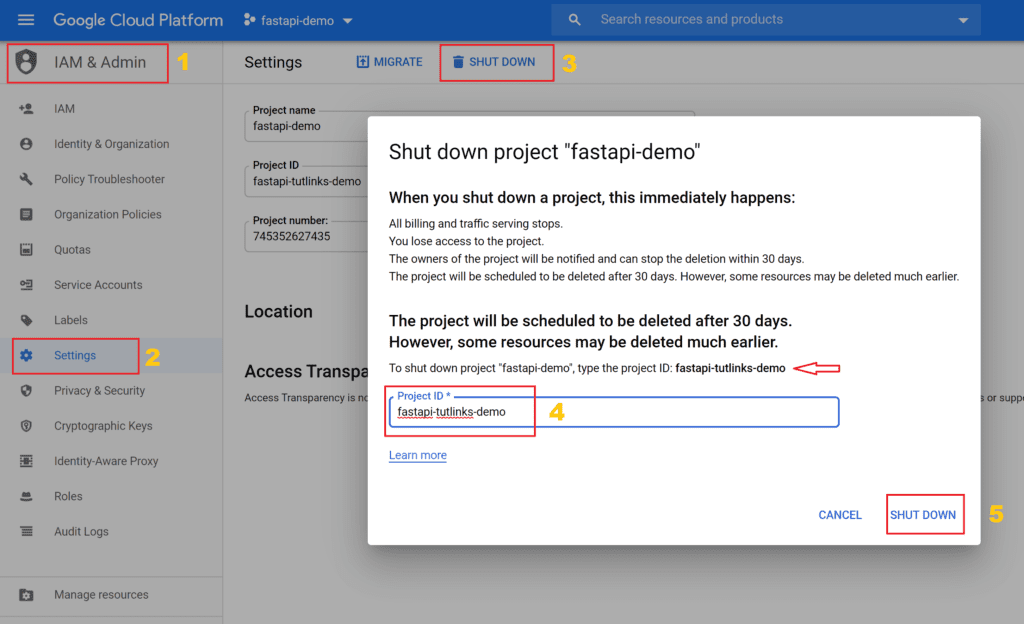
Once you are done with the deployment you may want to delete if you no longer need this project. For that navigate to IAM & Admin -> Settings -> SHUT DOWN (tab)
Key in the Project ID and hit SHUT DOWN button. The billing will be stopped effective immediately and the project will be deleted after 30 days.
Congratulations 🎉, you have mastered how to deploy a hello world FastAPI app on Google Cloud Platform using App Engine. The full source code of the FastAPI app deployed to Google Cloud is available on GitHub.
Video Tutorial
The video tutorial covers very basic details like
- Creating a project in GCP,
- Accessing the Cloud shell,
- Clone the repository on to Cloud Shell VM,
- Do a Sanity hosting of the FastAPI on Cloud Shell VM and explain about worker processes
- Create an App Engine
- Deploy FastAPI on to App Engine
- Check Logs of App Engine
- Clean up and Shutdown Project once practiced the tutorial.
Bookmark 🔖 (Ctrl + D) this page as a quick reference on how to deploy FastAPI app on Google Cloud Platform.
Check these resources to deploy FastAPI on On Premises and other Cloud Platforms


Pingback: Create and Deploy FastAPI app to Heroku – TutLinks
Pingback: Deploy FastAPI on Ubuntu and Serve using Caddy 2 Web Server – TutLinks
Pingback: Deploy FastAPI on Azure App Service – TutLinks
Pingback: Fastapi Google Inloggen - Gedetailleerde Informatie - Verstrekken