In this tutorial we will learn about the blazing fast web framework ever ASP.NET Core for .NET 6.0 (LTS) and see how to implement a Minimal web API.
Table of Contents
- Introduction
- Minimal web API using ASP.NET Core for .NET 6 (LTS)
- A sneak peek at the performance benchmarks of ASP.NET Core
- Prerequisites
- Create a new Minimal web API
- Run Minimal web API
- Port Configuration
- Add JSON Logging to the console
- Adding Swagger Specification
- Enable Hot reload
- Summary
Introduction
ASP.NET Core for .NET 6 is an open source framework to build powerful and blazing fast web-based applications that comprise front-end UI as well as back-end services. ASP.NET Core by default ships with Kestrel server. Kestrel server is a cross-platform web server that enables you build modern ASP.NET Core applications with support for HTTPS, HTTP/2 (except on macOS), WebSockets and Unix sockets.
Minimal web API using ASP.NET Core for .NET 6 (LTS)
The traditional way of implementing RESTful APIs in .NET WebAPI involve using controllers, a whole lot of bloated dependencies, un-necessarily large list of files and a humongous code base just to implement a simple endpoint with a plain text response.
The Minimal web API removes all these hassles, thus offering
- the least possible minimum number of files
- the minimal dependencies
- to the point features which you can extend on a need-to-needs basis
The Minimal web API is best suited for quick implementation of microservice using ASP.NET Core. If you take a peek at the source code, the Builder Pattern, is heavily used in WebApplicationBuilder and multiple other places. The builder pattern is used all across the places such as to build services, configuration, environment to mention a few in ASP.NET Core.
We will see why we should choose ASP.NET core for implementing a microservice in the next section.
A sneak peek at the performance benchmarks of ASP.NET Core
The performance of ASP.NET Core WebAPI is blazing fast. As per the techempower benchmarks, ASP.NET Core stood next to pico.v in terms of Plaintext responses.
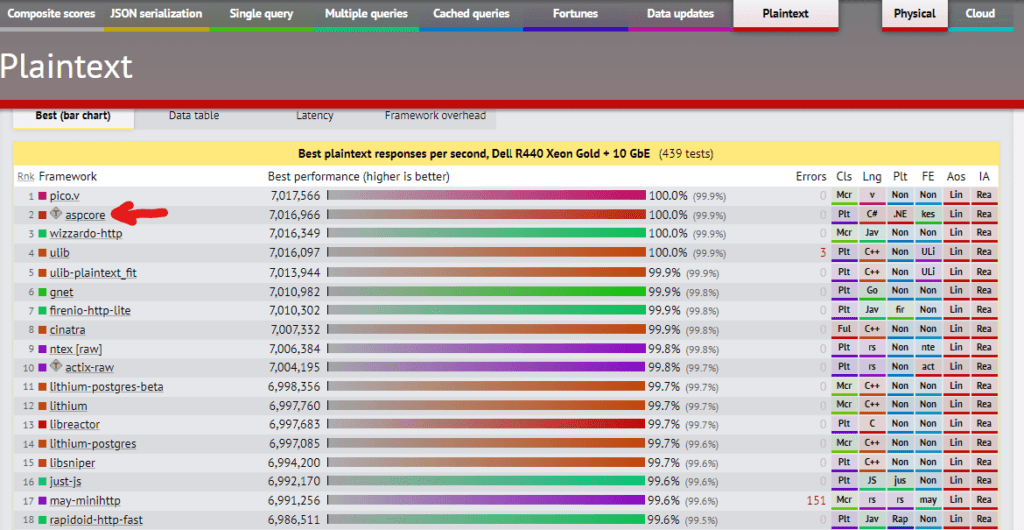
The pico.v is a web server written using V lang. The pico.v and is based on picoev and picohttpparser. Interested in learning V? Order my book Getting Started with V Programming.
In the category of web frameworks that perform at least a single query to database, the benchmarks show that ASP.NET Core has got its major share in the list of Best performance web frameworks.
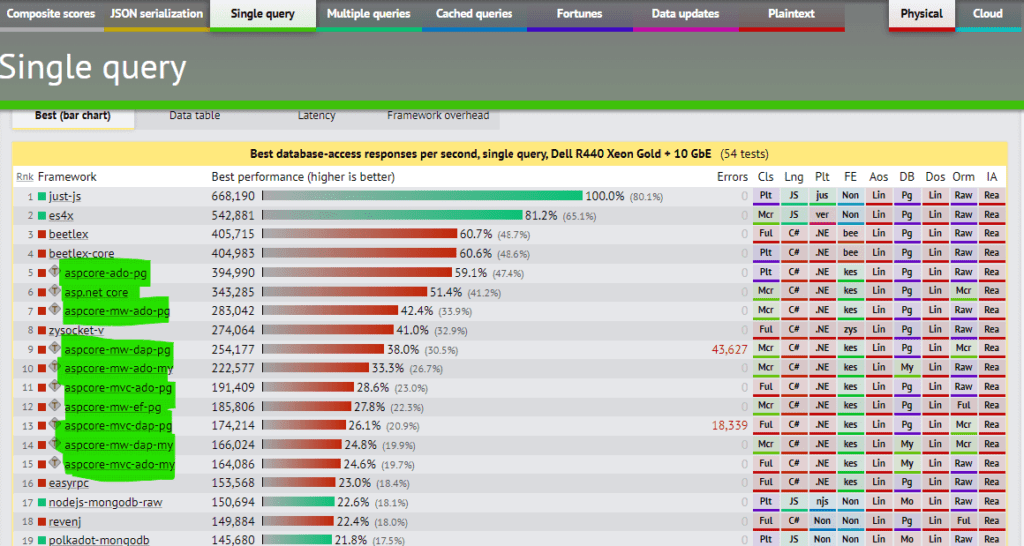
If you are looking to build a high-performance web application for next billion users, ASP.NET Core for .NET 6 is the go-to web framework of your choice.
Both the aforementioned benchmarks were obtained from techempower website. According to the source, these benchmarks were taken for a web application written using ASP.NET Core running on Kestrel web server on Linux. The physical hardware used to benchmark performance is Dell R440 Xeon Gold + 10 GbE.
Prerequisites
In order to follow along with this tutorial, it is recommended having the following list of tools and software installed on your PC.
- Admin privileges to the PC to install software
- Access to a command-line terminal
- You need at least .NET SDK 6.0.100 LTS or the latest installed on your PC
- Either of the following IDEs which are free to download and install Visual Studio Code or
- Visual Studio 2022 or latest.
- Postman or any REST Client
- Basic knowledge of computer programming
This tutorial will use VS Code, a light-weight IDE compared to Visual Studio 2022. With the aforementioned prerequisites in place, we will proceed and start creating a .NET 6 Minimal web API using ASP.NET Core.
Create a new Minimal web API
We will start by creating a project wherein we will add all the logic for our RESTful API. To start with, open the command line terminal and check for the version of .NET as follows.
dotnet --versionYou should see 6.0.100 or the latest in order to be able to proceed implementing minimal web API. Now, run the following command to create a new Minimal web API project with -minimal argument as shown.
dotnet new webapi -minimal -o NotesMinimalAPIThe argument -o accepts the string to indicate the name of the project. In this case it will be NotesMinimlAPI. After the command has run successfully, you should see a new directory created with the name NotesMinimalAPI.
To speed things up, we will proceed to launch this project in VS Code by running the commands from the terminal shown as follows.
cd NotesMinimalAPI
code .
Our project will have list of following files and directories.
E:.
|   appsettings.Development.json
|   appsettings.json
|   NotesMinimalAPI.csproj
|   Program.cs
|
+---obj
|       NotesMinimalAPI.csproj.nuget.dgspec.json
|       NotesMinimalAPI.csproj.nuget.g.props
|       NotesMinimalAPI.csproj.nuget.g.targets
|       project.assets.json
|       project.nuget.cache
|
\---Properties
        launchSettings.json
Only the .json, .csproj and .cs file in the root directory of the project that are essential files. From this point, we will modify our code in the Program.cs and appsettings.json. Once the VS Code launches, find and replace the contents of Program.cs file with the following.
var builder = WebApplication.CreateBuilder(args);
var app = builder.Build();

app.MapGet("/", () => "Welcome to Notes API!");

await app.RunAsync();
That’s it! In just 4 lines, you built your first ever Minimal web API using ASP.NET Core for .NET 6.
- In the preceding code, the static method
CreateBuilderof theWebApplicationclass accepts the magic variableargsthat holds an array of arguments. Theargsis populated from the list of arguments if any that are provided during the command to run this application. Also, theCreateBuildermethod returns the instance of theWebApplicationBuilderclass. - The
Buildmethod returns the instance ofWebApplicationconfigured by theWebApplicationBuilder. This is held in the app variable. Using the instance of app, you will have access to functionalities that allow you to manage ServiceProvider, Configuration, Logger, access Urls and a bunch of other stuff to contrive the behavior of a web application. - On the instance of configured
WebApplicationwhich is referred by the variable app will expose functionality to build endpoint routes and various other methods that help build the application.- For example, to implement a simple
GETendpoint that returns a plain text message, we use the extension methodMapGetavailable on app as follows:
- For example, to implement a simple
app.MapGet("/", () => "Welcome to Notes API!");- Finally, we are running our web application asynchronously using the command
await app.RunAsync();.
We will proceed to learn how to run our simple but minimal web API and see it in action.
Run Minimal web API
As we have built the basic Minimal web API, it is time for us to learn how to run and interact with WebAPI.
- Open the built-in terminal in VS Code by navigating to the menu Terminal -> New Terminal.
- From the command line terminal, navigate to the root directory of this project and run the following command.
dotnet runThe preceding command builds and then runs the application. You will see the output that shows up something as follows.
Building...
info: Microsoft.Hosting.Lifetime[14]
      Now listening on: https://localhost:7057
info: Microsoft.Hosting.Lifetime[14]
      Now listening on: http://localhost:5250
info: Microsoft.Hosting.Lifetime[0]
      Application started. Press Ctrl+C to shut down.
info: Microsoft.Hosting.Lifetime[0]
      Hosting environment: Development
info: Microsoft.Hosting.Lifetime[0]
      Content root path: E:\NotesMinimalAPI\
You will notice that the output will show two URLs, one with http and another with https. Using either of these urls, you will be able to interact with the API.
We also notice that the ports are randomly chosen based on the availability. In our case, the port 7057 is chosen automatically for the https instance and the port 5250 are chosen automatically for the http instance of the web application when you created a new project. You will find these port numbers under profiles section with the key for applicationUrl of Properties\launchSettings.json file.
In the next section, we will learn how to configure ports for http and https instances of our application.
Port Configuration
We learnt that the web API runs on randomly chosen ports in the previous section. But you can choose the ports of your choice instead of the web application to randomly choose them. You can configure the web application to run on specified ports in the following ways.
- Setting the port configuration programmatically using
app.Urls.Addmethod. - Adding Kestrel endpoint configuration in the appsettings.json.
- Setting the port configuration from the command line argument
--urlswhile running the app.
We will see each of the approaches and learn how to set ports 5000 for http and 5001 for https instance of the application.
You can also do url and port configuration using ASPNETCORE_URLS environment variable or by adding applicationUrl in launchSettings.json file. You can refer to this official documentation for more alternatives.
Before you proceed, ensure that the ports that you specify are free. This means to ensure that no other application already runs on these ports. We will use 5000 and 5001 for this tutorial. Also, it is recommended to follow any one of the three approaches mentioned for port configuration in this section.
Port Configuration programmatically
To set the port configuration programmatically, add the following lines to the Program.cs just before you call app.RunAsync() as follows.
app.Urls.Add("https://0.0.0.0:5001");
app.Urls.Add("http://0.0.0.0:5000");
Adding Kestrel endpoint configuration
To set the port configuration from the appsettings.json, add the Kestrel endpoint configuration as shown.
{
  "Kestrel": {
    "Endpoints": {
      "Https": {
        "Url": "https://localhost:5001"
      },
      "Http": {
        "Url": "http://localhost:5000"
      }
    }
  },
  "Logging": {
    "LogLevel": {
      "Default": "Information",
      "Microsoft.AspNetCore": "Warning"
    }
  },
  "AllowedHosts": "*"
}
Port configuration from the command line argument --urls
Alternatively, you can also configure the application to run on the port of your choice using the --urls argument that accepts the string value of the url. In case of multiple urls, you can separate them using ; as shown.
dotnet run --urls="https://localhost:5001;http://localhost:5000"I’ll choose having the port configuration in appsettings.json for demonstrated in Adding Kestrel endpoint configuration of this tutorial.
Add JSON Logging to the console
You can enable JSON logging output to the console by adding the following line right after you create builder.
// Configure JSON logging to the console.
builder.Logging.AddJsonConsole();
The other logging formats can be invoked using AddSimpleConsole and AddSystemdConsole methods.
The default logging mechanism is AddSimpleConsole in ASP.NET Core. You can also add application logs to NoSQL logging tools such as Logstash or Splunk or be it any TSDB (Time Series databases) such as InfluxDB or Prometheus. This can be done by using middleware using the app.UseMiddleware method.
We will now learn to see how to generate swagger spec for our ASP.NET Core 6 Minimal web API in the next section.
Adding Swagger Specification
As we are implementing a RESTful interface, we would like the consumers of our API to know how to use it. For such scenarios, APIs generally have specification documents often termed OAS (openAPI specification) or Swagger specification.
The file specification comes in JSON format and is named swagger.json. The name swagger is an old-school name of the OpenAPI specification. ASP.NET Core for .NET 6 with the help of package Swashbuckle.AspNetCore comes with the capability to auto-generate the Swagger spec for your RESTful application.
Using the command-line, navigate to the root of your project and run the following command to install Swashbuckle.AspNetCore.
dotnet add package Swashbuckle.AspNetCore --version 6.2.3Now, update Program.cs such that it appears as follows.
var builder = WebApplication.CreateBuilder(args);

// Add services to the container.
// Learn more about configuring Swagger/OpenAPI at https://aka.ms/aspnetcore/swashbuckle
builder.Services.AddEndpointsApiExplorer();
builder.Services.AddSwaggerGen();

var app = builder.Build();

// Configure the HTTP request pipeline.
if (app.Environment.IsDevelopment())
{
    app.UseSwagger();
    app.UseSwaggerUI();
}

app.MapGet("/", () => "Welcome to Notes API!");

app.Run();
From the preceding code, we notice that the builder is adding services by invoking the methods AddEndpointsApiExplorer and AddSwaggerGen. Also, we want this Swagger spec to be available for development purposes only. So we generate swagger.json file only when the application is running in development mode. This is controlled in the if block with the condition app.Environment.IsDevelopment().
Visit url https://localhost:5001/swagger or http://localhost:5000/swagger and you should see the swagger spec for our RESTful application implemented so far.
Enable Hot reload
During the development, we might have multiple code changes coming along our way. In such cases it becomes tedious to kill and re-run the .NET application every time.
With .NET 6, you have the hot reload feature with which you can edit and continue to see your changes automatically reflected in your application.
To enable hot reload, run the following command.
dotnet watch runBefore you run in watch mode that enables hot reload, I recommend you to stop the application if it is already running by using Ctrl+C keys. A list of supported edits that reflect when your application running in hot reload mode can be seen here.
At any point in time if you want to restart the application, you have to hit Ctrl+R to restart the application back again in hot reload mode.
Summary
In this tutorial, we learnt brief introduction to ASP.NET Core for .NET 6 LTS. We then learnt the motivation for using ASP.NET Core for .NET 6 to implement Minimal web API for your next billion customers by going through benchmarks.
We then started by installing prerequisites. We then created our first Minimal web API. We also covered how to configure our Minimal web API to run on Port our our choice using various Port configurations. We then saw how to add JSON logging, Swagger a.k.a OpenAPI specification to our Minimal web API. We then learn how to enable Hot reload for our Minimal web API to watch the changes in real-time as we make changes to our code base.
Having set up the web application and its aesthetics, we will now proceed to learn how to implement Minimal web API with CRUD on PostgreSQL in the next blog post.
If you like this tutorial, please do bookmark 🔖 (Ctrl +D) it and spread the word 📢 by sharing it across your friends and colleagues.

Pingback: Minimal web API with CRUD on PostgreSQL: A RESTful Microservice implementation in ASP.NET Core for .NET 6 – TutLinks